
Crochet is very versatile. It's great for making shapes and forms. I've seen a lot of crocheted Viking Helmets on line, but most of them don't come with patterns, so I decided to come up with my own. Happy Halloween!

Materials
- Red Heart Super Saver Yarn in Country Blue, Coffee, and Buff
- Caron Simply Soft Mango
- H and G Crochet Hooks
- Polyfil fiber
- Darning Needle
6 sts and 3 rows = 2 inches
Corrections
Corrections are in red print.
Special Stitches
FPDC--Front Post Double Crochet--do a regular dc stitch, but insert the hook under the post of the stitch you are attaching it too, this will make the stitch pop out from the rest of the stitches.
 |
| YO hook, insert hook under post of st |
 |
| YO, pull up a loop |
 |
| YO, pull through 2 loops |
 |
| YO, pull through last 2 loops |
 |
| finished FPDC |
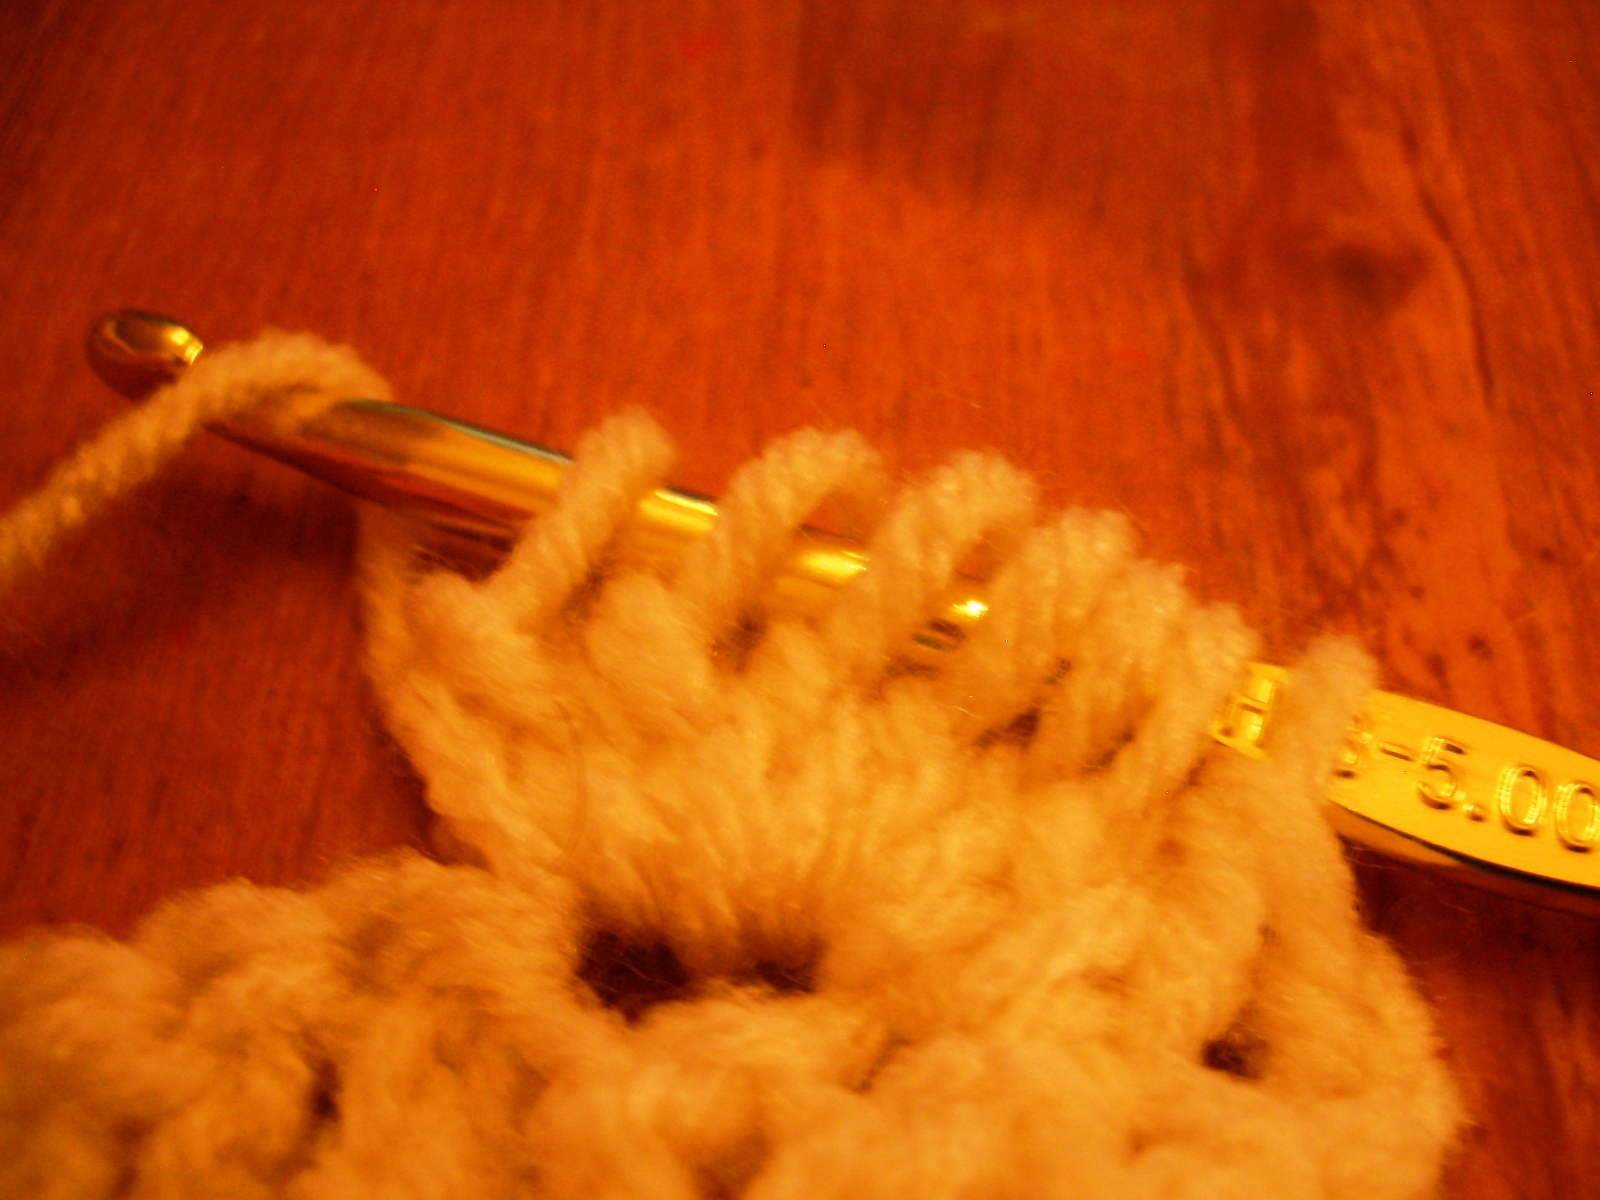
Bobble--Yarn over hook (YO), insert hook into stitch (st) , YO, pull up a loop (lp) YO, pull through 2 lps, *YO, insert hook into same st, pull up a lp, YO pull through 2 lps* 5 times, you should have 7 lps on your hook. YO pull through all lps on the hook. YO pull through the one lp on the hook to secure the Bobble. Push your finger through the back to get it to pop out.
 |
| YO, insert hook in stitch |
 |
| Pull up a loop, YO, pull through 2 loops |
 |
| 2 loops on hook, YO |
 |
| Insert hook in same stitch |
 |
| Pull up a loop, YO, pull through 2 loops on hook. Continue with YO insert Hook in stitch, YO pull through 2 loops until you end up with... |
 |
| 7 loops on the hook |
 |
| YO, pull through all loops on the hook |

 |
| YO, pull through one loop on hook to secure |

 |
| Push out bobble |

Abbreviations
ch(s)--chain(s) dc(s)--double crochet(s)
sl st--slip stitch beg--beginning
st(s)--stitch(es) FPDC--front post double crochet
hdc--half double crochet
m2--do 2 scs in the same st m2 x 2--do 2 scs in next 2 sts
Hat
Rnd 1: Starting with H Hook, Country Blue yarn and a Magic Circle ch 3 (counts as first dc) then 11 dcs in circle, sl st in top ch of beg ch. (12 dcs) (correction)


Rnd 2: Ch 3 (counts as first dc), dc in same dc, 2 dcs in next dc, FPDC in next dc, *(2 dcs in next dc) two times, FPDC in next dc* 3 times, sl st in top ch of beg ch.


 |
| FPDCs |
Rnd 3: Ch 3, 2 dcs in next dc, 1 dcs in next dc, 2 dcs in next dc, FPDC over previous FPDC. *(dc in next dc, 2 dcs in next dc) two times, FPDC over previous FPDC* 3 times, sl st in top ch of beg ch.

 |
| You get the idea, see the ridges forming? |
Rnd 5: Ch 3, dc in next 2 dcs, 2 dcs in next dc, dc in next 3 dcs, 2 dcs in next dc, FPDC in previous FPDC. *(dc in next 3 dcs, 2 dcs in next dc) two times, FPDC in previous FPDC* 3 times, sl st in top ch of beg ch.
Rnd 6: Ch 3, dc in next 3 dcs, 2 dcs in next dc, dc in next 4 dcs, 2 dcs in next dc, FPDC in previous FPDC. *(dc in next 4 dcs, 2 dcs in next dc) two times, FPDC in previous FPDC* 3 times, sl st in top ch of beg ch.
Rnd 8: Ch 3, dc in next 5 dcs, 2 dcs in next dc, dc in next 6 dcs, 2 dcs in next dc, FPDC in previous FPDC. *(dc in next 6 dcs, 2 dcs in next dc) two times, FPDC in previous FPDC* 3 times, sl st in top ch of beg ch.
Rnd 9 to 11: Ch 3, dc in each dc, FPDC in each FPDC around, sl st in top ch of beg ch. Fasten off leaving a tail for weaving in.
Rnd 12: Attach Coffee yarn, to ch 3 of row 11 using the G Hook, ch 2, hdc in same st and then hdc in each dc and FPDC around (don't do a fphdc), sl st in top of first hdc.
Rnd 13: Ch 3, dc in next two dcs, Bobble, *dc in next 3 dcs (don't skip any dcs), Bobble* 16 times, dc in last dc, sl st in top ch of beg ch.
Rnd 14: Ch 2, hdc in same st, hdc in each st around (including Bobble), sl st in first hdc. Fasten off, leaving a tail for weaving in.
Horns
Using the Buff yarn and the G Hook I used this pattern from MyGurumi. The horn is done in a spiral, so you may have to use a stitch marker to keep track of where you are. She uses a little bit different abbreviations in her pattern.
Greenbutterfli over at Ravelry told me she had trouble with the link to this pattern.
MyGurumi uses the Magazine format, which is hard to read. You can click on the drop down button on the left for the classic view, but then it goes to her most recent post, but if you type horn in the search box the pattern will come up and it's readable.
Check out Greenbutterfli's hilarious version of the Viking Helmet here.
m2--2 scs in same sc
m2x2--2 scs in same sc two times
sc4 (etc)-sc in next 4 sts, or the number next to the sc
sc4 (etc)-sc in next 4 sts, or the number next to the sc
I also just used a regular magic circle in the beginning. Instead of finishing the last sc, I added in the Coffee yarn and did four more rows in the following manner:


Rnd 19: sc9, m2, sc12
Rnd 20: sc10, m2 x2, sc10, sc2tog
Rnd 21: sc10, m2, sc13, Fasten Off leaving a tail about 10 inches long. You will use this to sew the horn together and then to attach it to the hat. Make 2.


then stuff with polyfil and sew onto hat between FPDC rows.

Braids
Wrap Mango yarn around your forearm, from thumb to elbow about 40 to 50 times, enough to make two fairly thick braids. 
Cut the yarn at both ends to make straight strands. Separate yarn into to two hanks. Tie one end of one hank with a short piece of Mango yarn, then braid and tie opposite end with a short piece of Coffee yarn. Trim ends to make them even and then sew the ends tied with the Mango yarn under the hat directly beneath the horns. If you would rather have a beard check out this cool pattern by Melissa Campbell.


Love this! Thanks for the pattern -- it will be my Halloween costume!
ReplyDeleteI'm glad you like it, I'll be wearing mine for Halloween too.
DeleteI love this!! I will have to try to make this for my daughter. She's 22 but she loves hats & this would be crazy awesome for her. Thank you so much for sharing your pattern & taking the time with the extra tutorial. I wouldn't be able to even think about trying it without the help you provided, so, again, thank you!!
ReplyDeleteYour welcome!
DeleteI had to pin this! My husband and I both have ancestors from Norway so I feel it's my duty to pin. Thank you so much for sharing the pattern for free as it is in my budget these days. Have a great day!
ReplyDeleteHiya, I think you need to make a correction... Rnd 2 requires 12 sts but rnd 1 only makes 8 in the magic ring. This puzzled me for a good hour!! 12 sts in the magic ring corrects this.
ReplyDeleteThanks Beansprout, I went back and tried your suggestion and you are right, I made the correction.
DeleteLOL Love it
ReplyDeleteThanks, I had a lot of fun with this one.
DeleteAwesome hat!!!! I love this! Thank you very much for posting this! :)
ReplyDelete______
Lee Ann H
Crochet...Gotta Love It! Blog
Crochet...Gotta Love It! Website (crochet names and rosary patterns)
Thanks!
DeleteYour pattern is just perfect! I'm gonna translate it into Portuguese and post in my blog!
ReplyDeletewww.minhasagulhaseeu.wordpress.com
God bless you!!!
=)
Please link back to my blog.
DeleteTake a look, Pam!
ReplyDeletehttp://minhasagulhaseeu.wordpress.com/2013/05/09/gorro-viking/
Hey! I'm doing your pattern, and after the bobbles, the next row of HDC will have increased, right? Because you're adding a stitch with each bobble due to the extra slip stitch? I've never done bobbles before, so I'm confused as to what happened to my stitch count.
ReplyDeleteYou should be doing your bobbles in a dc stitch. The slip stitch is just to attach the finished row together. There are no added stitches.
DeleteHope this helps
But wouldn't pulling a loop through all 7 loops be the equivalent of one stitch [the stitch you're making the bobble into] and then pulling another loop through the one loop left on the hook to secure the bobble result in an extra stitch? I just don't understand why I've had no problem maintaining a stitch count this whole time, but then after the row of bobbles, I suddenly find myself with 18 extra stitches.
DeleteMake sure you are doing the next stitch after the bobble in the very next double crochet stitch, it's easy to skip over one because the bobble is so big. This helps the bobble pop out more as well. The extra chain to close the bobble shouldn't add another stitch.
DeleteThis comment has been removed by the author.
ReplyDeleteThank you for this hat pattern it will be so perfect for my son his name id Odyn so it's only fitting ;)
ReplyDeleteI'm glad you like it!
DeleteI've finished the hat part and ready to make the horns, however, I don't understand the directions. They seem to start at row 18. Does that M2, M2x2 stuff constitute instructions? If so, I don't understand.
ReplyDeleteThat's because the first part of the pattern comes from another website. Click on this pattern from My Gurumi for the beginning part.
DeleteThank you so much for this pattern! I've been searching for it for two solid days to make it for my son for Christmas! Thank you thank you thank you! Merry Christmas and Happy New Year!
ReplyDeleteYou're Welcome! Merry Christmas!
Deletewhy do I have a whole extra section after the 4th ridge on round 2. it is causing the hat to be way to big. But if I don't continue with the row, there are spaces left. It is almost as if Round one has too many ??? does this make sense? I believe the 8 still works for round 1, as long as you remember to do one last FPDC just before you sl st at the end of the round.
ReplyDeleteIf you could email me a picture of what your hat looks like to crochetparfaitpg@yahoo.com I might be able to see what's going on.
DeleteYour pictures wearing the hat are tremendously funny, just loved it! I believe I may try this pattern, but I am not familiar with fancy knots like those you have specified. But the tutorial pictures are nice, hope I can do it! :) Again, thanks for sharing!
ReplyDeleteWhat does "m2" mean in horn instructions
ReplyDeleteSorry, I was using the abbreviations My Gurumi used for the horn pattern (she uses her own shorthand and unfortunately doesn't explain it.) M2 means do 2 scs in the same stitch. M2 x 2 means do two scs in the next 2 sts.
DeleteI appreciate the pattern but I don't get why you'd use someone else's shorthand (m2) forcing all of us to ask about it.
ReplyDeleteHi, I´m from Brazil and I need to tell you one think:
ReplyDeleteYOU ARE THE BEST!
I never seen anything like that, your work is amazing.
Congratulations :)
Obrigado!
DeleteLove the hat, the horn instructions were beyond me and I am not patient enough to work my thru it ao I came up with an alternative. Chain 16, TC in 3 chain from hook, then 3 more TC, 4 DC, 4 HDC, SC to end. Chain one turn then reverse order of stitches in first row. Repeat those two rows then fold in half and SC together. I then finished as you did with the coffee yarn. My grandsons will be wearing these aith crocheted beards...my little Vikings :)
ReplyDeletecan you possibly gauge it down to a child's size? I cannot see paying the prices on etsy for a one day prop.
ReplyDeleteI am following this pattern bc of your pics of the details of certain stitches. Sometimes youtube videos go too fast.
Thank you...
We are viking descendants, if you saw my sons youd totally know it so this is a perfect pattern to make for the sons and their wives for a family get together lol Thank you so much!!!
ReplyDelete